Your first run through Payreq Delivery is mostly a question of sequence. Once you have done it once, the pattern repeats. This article covers what to have in place beforehand, what happens on the day, and what differs when a print service provider does the work for you.
Onboarding itself is covered in Getting started: Payreq Delivery for billers and mailers.
Before your first run
Your account is ready when your onboarding contact confirms that:
- your document configuration is complete and test files have been processed successfully;
- your branding, authentication rules and contact identification rules are set;
- your delivery channels are enabled; and
- the people who need console access have it, at the right permission level.
If BPAY View is one of your channels, activation involves your bank as well as Payreq. Your Payreq account manager will confirm the forms, bank checks and reference fields required for your implementation. Do not assume that an inherited checklist applies to every new Biller Code.
Two questions are worth settling before the first run rather than during it:
- Who does what. Who updates Contacts, who uploads, who approves, and who reviews the outcomes.
- What happens to recipients without a digital Subscription. They still need their document. See "If you do not use a print service provider" below.
Running it yourself
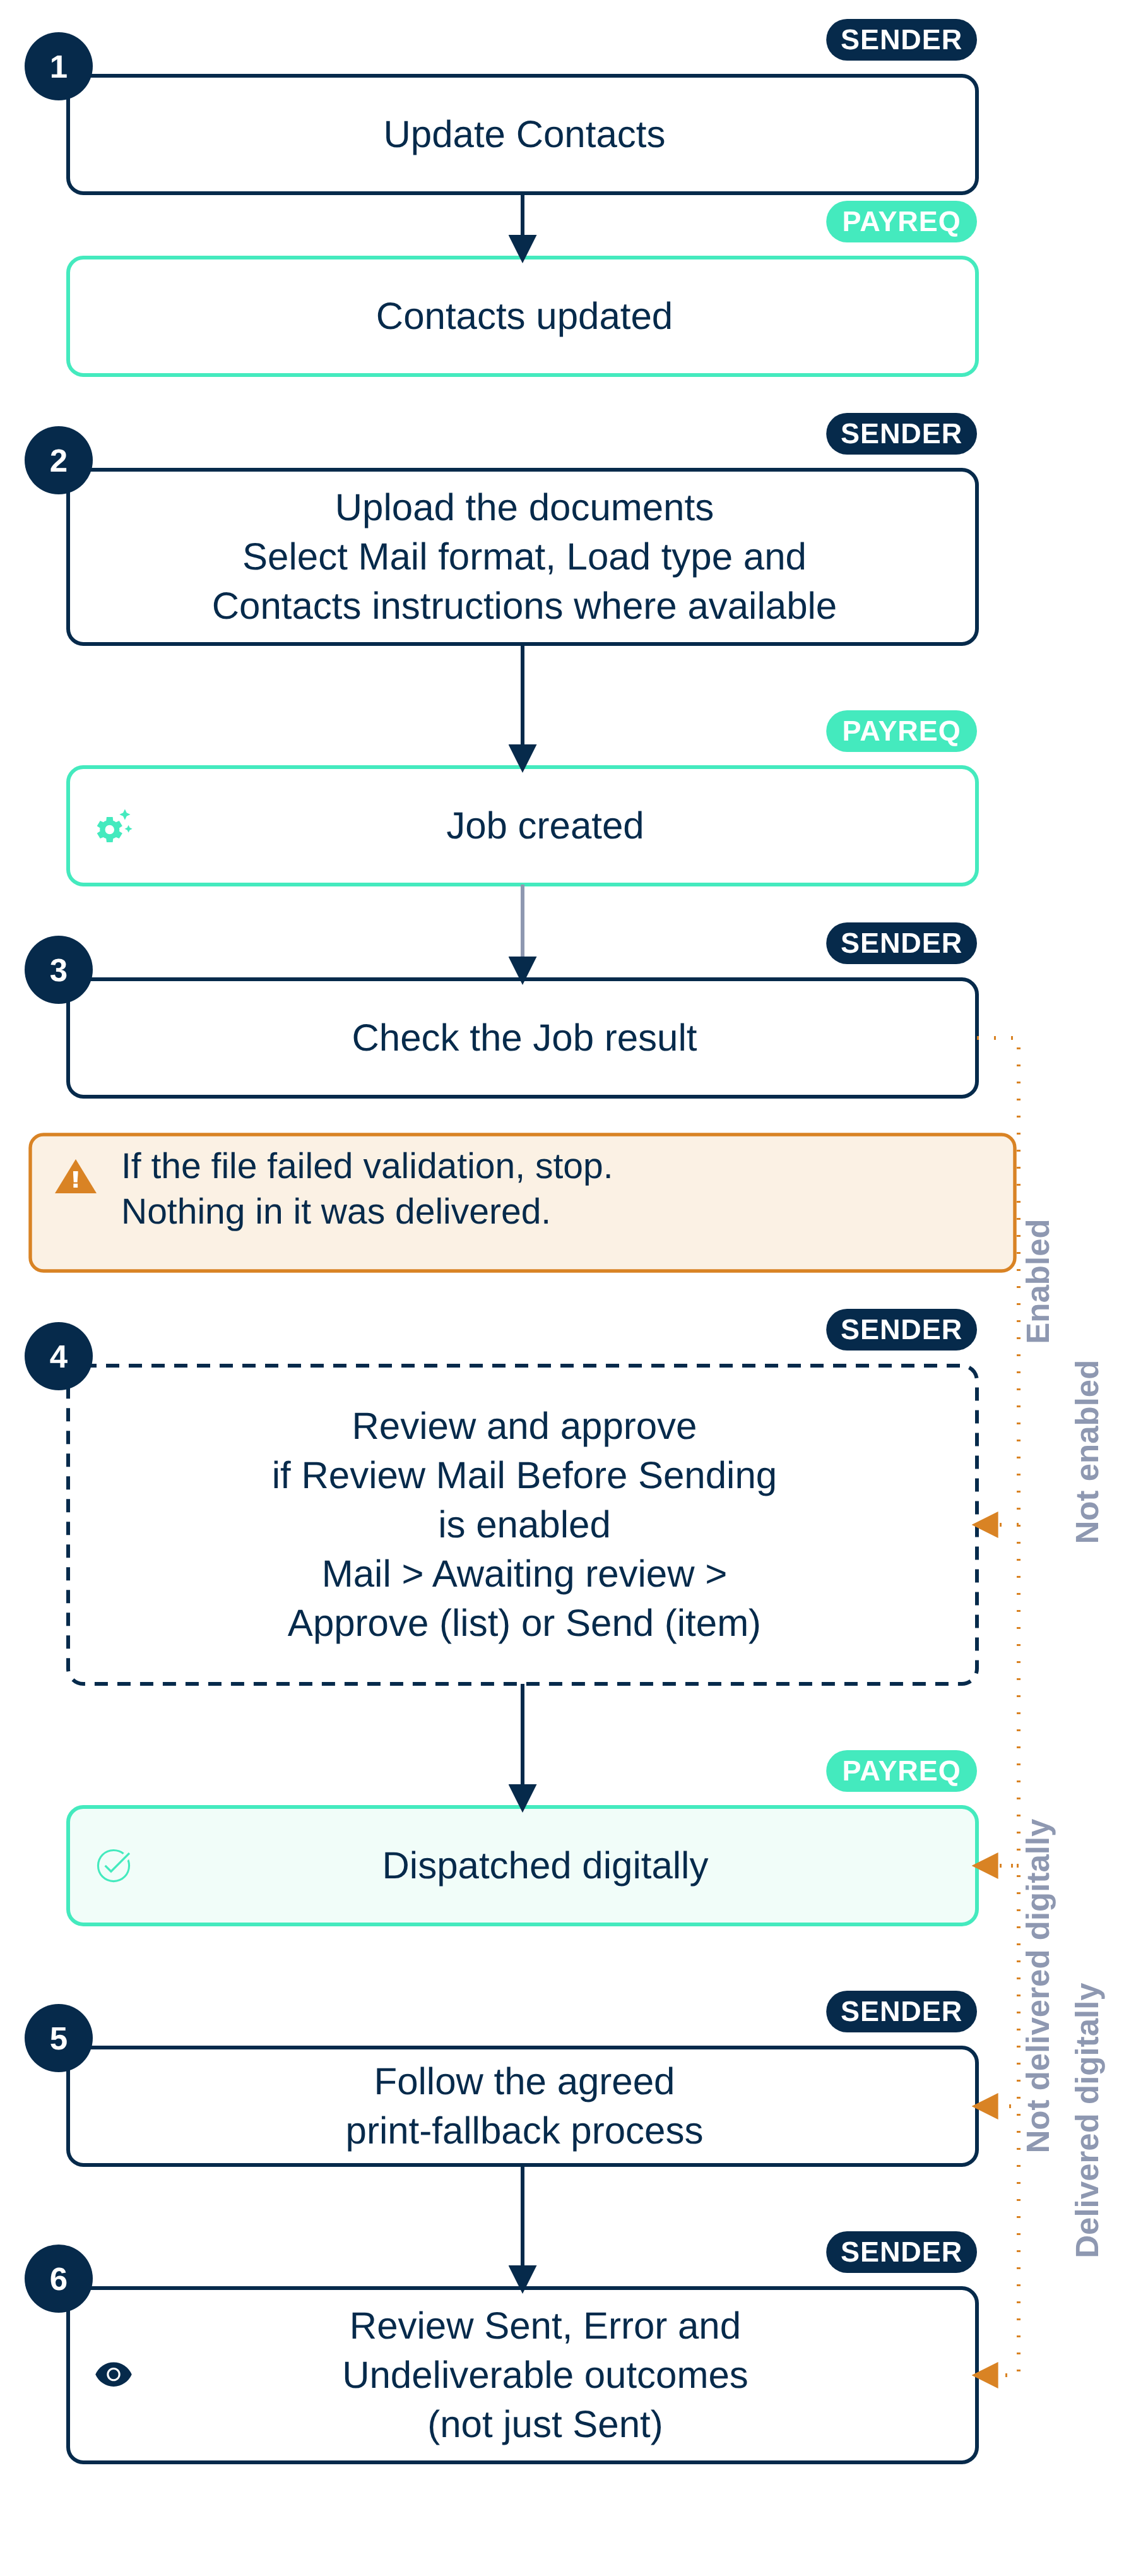
- Update your Contacts. Do this first. Subscriptions are matched from your Contact data, so an out-of-date Contact list produces avoidable failures. See Updating Contacts in the Payreq console.
- Upload the documents. Go to Mail, then upload. Choose the Mail format, the Load type and the Contacts instructions for the upload. See Uploading Mail and Bill load types: Standard, Archive and Historical.
- Check the Job. Confirm the file processed before assuming anything was sent. If it failed validation, nothing in it was delivered. See Understanding Job Statuses and Errors.
- Review and approve, if the Review Mail Before Sending option is enabled for your account. Go to Mail and filter to Awaiting review. Use Approve for selected list items or Send from an individual item's detail.
- Follow your agreed print-fallback process. Recipients who are not delivered to digitally still need their documents. Check the Job and Mail results, then use the print and post arrangement agreed during onboarding. Do not assume Payreq forwards them automatically.
- Review the outcomes. Check Error and Undeliverable, not just Sent. See Handling Undeliverable Mail.
Running it with a print service provider
Where a mailhouse or print service provider prepares, prints and lodges your notices, the same steps happen but they are shared out, and the sequence matters more because both sides are working from the same Subscription position.
In outline:
- you provide the notice data;
- the mailhouse retrieves the current Active Subscriptions list, as close as practical to the print decision;
- the mailhouse splits the run into a digital population and a print population;
- the digital population is uploaded as a Standard load and the print population as a Historical load;
- you review and approve the digital notices; and
- the mailhouse prints and lodges the rest.
The full process, including why two loads are recommended over a single Archive load, is in Bill run procedures (Print Service Provider).
Your part of that process is usually steps 1 and 5: making sure Contacts are current, and approving the digital notices. Agree the rest with your mailhouse before the first run.
If you do not use a print service provider
Not every recipient will have a digital Subscription, particularly early on. Agree how those documents will be identified, printed and posted before the run. Check the Job and Mail results rather than assuming that Payreq has forwarded or archived an unsuccessful digital record.
Plan for this in the first run rather than discovering it afterwards. On an early run the printed population is usually the larger of the two.
What to expect afterwards
- Registrations grow over time. The first run is the low point for digital take-up, not the norm.
- Undeliverables cluster around data. The first run tends to surface reference-number mismatches between your source system and your Contacts file. Fix them at the source.
- Set your notifications. Notification preferences are per user, so decide who should be told about failed Jobs and undeliverable Mail before the second run rather than after. See User Notifications.
Once the first run is behind you, Recommended processes for Payreq Delivery covers the routine to settle into.
Related articles
Was this article helpful?
That’s Great!
Thank you for your feedback
Sorry! We couldn't be helpful
Thank you for your feedback
Feedback sent
We appreciate your effort and will try to fix the article